Guide de fin de saison · Tous les modèles 9YF · Rangement et préparation printanière
Guide d'hivernage des presses à balles carrées
Les travaux effectués dans la dernière heure de la saison de pressage déterminent l'état de la machine lors de la première session de la saison suivante. Les résidus de récolte retiennent l'humidité, la ficelle absorbe l'humidité hivernale, le métal nu rouille sur les surfaces exposées et les roulements non graissés se piquent pendant les mois d'immobilisation. La procédure de stockage décrite dans ce guide prévient tous ces phénomènes et permet à l'entretien de pré-saison de se concentrer sur l'inspection plutôt que sur les réparations.
Sommaire : procédure de nettoyage · retrait de la ficelle · lubrification avant stockage · protection contre la rouille · entretien de la chaîne · utilisation intérieure ou extérieure · vérification de la boîte de vitesses · remise en service au printemps
Pourquoi la préparation de fin de saison détermine la fiabilité de la saison suivante
Les dommages qui s'accumulent sur une presse à balles non préparée pendant l'hivernage sont silencieux et progressifs. L'humidité se condense dans les cavités des roulements pendant les nuits froides et ne s'évapore pas complètement lors des brèves périodes de redoux, ce qui provoque des piqûres sur les bagues de roulement. Ces piqûres se traduisent par une rugosité granuleuse lorsqu'on fait tourner le roulement à la main au printemps. Les résidus de récolte laissés dans le mécanisme de nouage retiennent l'humidité et accélèrent la corrosion sur les surfaces de précision du galet suiveur de came et du mécanisme du crochet. Les maillons de la chaîne d'entraînement non lubrifiés forment une liaison de rouille entre l'axe et le rouleau, ce qui rigidifie les maillons et nécessite leur remplacement plutôt qu'une simple lubrification au printemps.
Chacune de ces pannes peut être facilement évitée : la procédure de remisage prend 60 à 90 minutes et ne coûte que du temps et une petite quantité de consommables. Les coûts de réparation — remplacement des roulements, nettoyage du mécanisme de nouage, remplacement de la chaîne de transmission — représentent généralement 10 à 20 fois l’investissement initial. Effectuer cette procédure de remisage à la fin de chaque saison constitue l’un des retours sur investissement les plus évidents en matière d’entretien agricole.
Étape 1 : Retirer la ficelle — Commencez par ceci
Avant toute manipulation, retirez complètement la ficelle de la machine, avant le nettoyage et la lubrification. Cela inclut : les deux bobines de leurs supports, la ficelle enfilée dans les chas d’aiguille, le chemin entre la bobine et l’aiguille à travers chaque œillet de guidage, ainsi que tous les bouts de ficelle ou résidus présents dans le mécanisme de nouage et la zone de la goulotte d’évacuation.
Il est important de retirer la ficelle en premier : la ficelle en polypropylène laissée sur la machine absorbe l’humidité ambiante pendant l’hivernage et perd de sa résistance à la traction sans que cela soit visible. Une bobine laissée sur une machine extérieure pendant un hiver humide peut perdre de 15 à 25 % de sa résistance nominale aux nœuds au printemps, ce qui peut entraîner des ruptures de ficelle dès la première utilisation, même avec une ficelle qui semble neuve mais dont la structure est compromise. La ficelle laissée enfilée dans les œillets de guidage peut également emprisonner l’humidité au point de contact, accélérant ainsi la corrosion.
Rangez toutes les bobines de ficelle retirées dans un contenant hermétique ou dans un bâtiment sec et sombre, à l'abri des rayons UV. Les bobines laissées sur des palettes en bois ou des étagères dans une grange couverte conviennent ; celles stockées sur un sol en béton ne le sont pas, car l'humidité remonte par capillarité à travers le noyau en carton. Étiquetez le contenant en indiquant la résistance du nœud de la bobine et la saison d'achat afin de gérer la rotation des stocks les saisons suivantes.
Étape 2 : Nettoyage de la machine
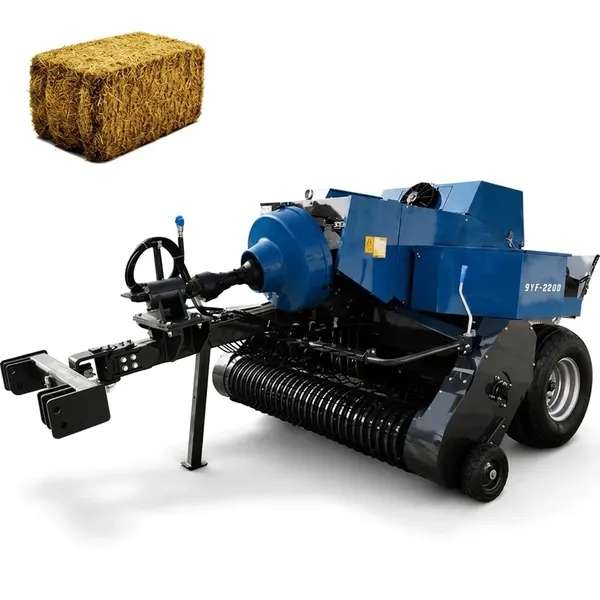
Pourquoi le nettoyage avant le graissage est important
Graisser une machine sale — en appliquant de la graisse fraîche sur les résidus de récolte et la terre accumulés — ne la protège pas. Les résidus de récolte retiennent l'humidité sous la couche de graisse et continuent d'accélérer la corrosion. Un nettoyage préalable est indispensable avant toute lubrification pour le remisage afin de garantir que la graisse soit appliquée sur des surfaces métalliques propres et sèches, où elle pourra former le film protecteur nécessaire.
Procédure de nettoyage
ÉTAPE 1
Souffler à l'air comprimé En partant du haut de la machine et en descendant, portez une attention particulière aux éléments suivants : le mécanisme de nouage et l’intérieur du protecteur, le ramasseur entre les rangées de dents, l’entrée d’alimentation et le mécanisme de fourche, ainsi que l’intérieur de la chambre de pressage.
ÉTAPE 2
Laver à l'eau à basse pression Pour enlever la saleté du pick-up et du châssis, évitez le lavage à haute pression directement sur les joints de roulement et les connexions électriques : la haute pression pourrait forcer l’eau à travers les joints. Un rinçage à basse pression du châssis vers l’extérieur est suffisant.
ÉTAPE 3
Laisser sécher complètement — au moins 4 heures dans des conditions sèches — avant de procéder à la lubrification. Graisser une machine humide emprisonne l'humidité sous la graisse dans les cavités des roulements. Séchez la machine dans un endroit abrité et ventilé si possible.
Étape 3 : Lubrification de stockage — Tous les raccords
Le graissage pour remisage consiste en une lubrification complète de la machine, incluant tous les raccords et accessoires, et pas seulement ceux utilisés quotidiennement. Cette opération est distincte et complémentaire au graissage d'entretien avant saison. Son but est de protéger la machine contre la corrosion pendant la longue période de remisage, et non d'assurer sa lubrification en fonctionnement.
Graissez systématiquement chaque raccord en suivant le schéma des zones du guide de lubrification (G4) : zone 1, raccords du noueur ; zone 2, raccords du pick-up ; zone 3, raccords de l’alimentateur ; zone 4, raccords du piston et de l’entraînement ; zone 5, raccords du châssis et de la roue d’étoile. Appliquez 2 à 3 passages de graisse par raccord, suffisamment pour chasser l’humidité résiduelle, mais pas trop pour ne pas forcer la graisse au-delà des joints. La graisse appliquée lors du remisage sera complétée par le graissage d’entretien de printemps.
Après avoir graissé tous les raccords, graissez également directement les surfaces du rail de guidage du piston — appliquez la graisse à l'aide d'un pinceau ou d'un chiffon sur les faces supérieure et inférieure du rail sur lesquelles glisse le piston, car ces surfaces ne comportent pas de raccords à embout et nécessitent une application manuelle.
Étape 4 : Protection antirouille des surfaces métalliques nues
Plusieurs surfaces d'une presse à balles carrées sont en métal nu, sans protection de peinture : la face du piston, les bords des lames, les pointes des aiguilles, les surfaces des maillons de la chaîne et les parties exposées des points de fixation des dents du ramasseur. Ces surfaces rouillent pendant le remisage hivernal humide, faute de film protecteur.
Face du piston : Essuyez avec un chiffon légèrement huilé avec de l'huile de machine légère ou un spray antirouille. La face plate en acier du piston se couvrira de rouille superficielle pendant un hiver humide sans protection ; la rouille s'enlève facilement au printemps, mais si on la laisse après la saison, cela peut accélérer la formation de piqûres sur la face au niveau des zones d'usure.
Tranchants de la lame du couteau : Appliquez un inhibiteur de rouille ou une fine couche d'huile sur les deux tranchants de la lame. La rouille modifie le tranchant d'une lame : une lame légèrement rouillée peut encore couper, mais pas proprement, produisant un aspect irrégulier, semblable à celui d'une lame émoussée.
Conseils d'aiguilles : Appliquez un spray antirouille. La pointe de l'aiguille est une surface de précision ; la formation de piqûres de rouille sur sa face modifie légèrement la géométrie du passage du fil au niveau du crochet, ce qui peut entraîner une formation irrégulière des nœuds au printemps après le stockage.
Chaînes d'entraînement : Appliquez généreusement de l'huile de chaîne neuve sur tous les maillons exposés. L'huile de chaîne offre une meilleure protection contre la rouille que la graisse pour les surfaces exposées de la chaîne et pénètre à l'interface axe-galet pour chasser l'humidité des espaces les plus restreints au niveau de l'articulation.
Étape 5 : Contrôles mécaniques avant stockage
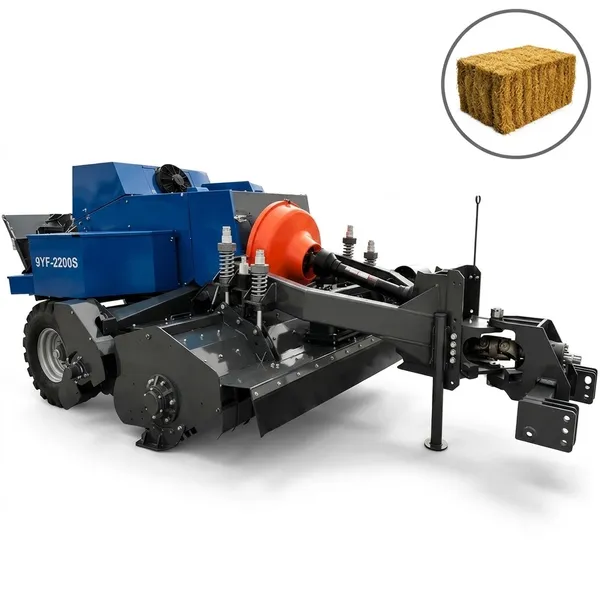
État et niveau de l'huile de boîte de vitesses
Prélevez un échantillon d'huile de boîte de vitesses sur un chiffon blanc. Si elle est laiteuse, contient des particules métalliques ou si son intervalle de vidange est largement dépassé, vidangez-la avant l'hivernage. L'huile contaminée restée dans la boîte de vitesses pendant l'hiver continue de se dégrader et de corroder les surfaces internes. Une huile propre dans la boîte de vitesses arrive au printemps en meilleur état qu'une huile contaminée vidangée lors de la révision de pré-saison.
État du boulon de cisaillement
Vérifiez que le boulon de cisaillement est présent et conforme aux spécifications. Si plusieurs boulons de cisaillement ont été remplacés au cours de la saison, remplacez-le par un neuf avant le remisage. Vérifiez sa conformité aux spécifications indiquées dans le manuel d'utilisation et rangez 10 boulons de rechange conformes avec la machine.
Tension et état de la chaîne de transmission
Réduisez légèrement la tension du tendeur de chaîne de transmission en dessous de sa tension de service avant le remisage ; une chaîne maintenue à sa tension de service maximale pendant des mois peut entraîner un relâchement des contraintes dans le ressort du tendeur. Vérifiez l’allongement de la chaîne ; si elle atteint ou approche du seuil de remplacement, commandez la chaîne de rechange pendant l’hiver afin de l’avoir sous la main pour la révision de pré-saison, plutôt que d’attendre le jour de l’entretien.
Pièces à commander en hiver
Consignez toutes les pièces présentant un défaut mineur identifié lors du contrôle mécanique de fin de saison. Commandez ces pièces pendant l'hiver, lorsque le temps n'est pas un facteur déterminant, et assurez-vous de leur livraison avant la date de la révision de pré-saison. Attendre le jour de la révision pour commander les pièces revient à scinder l'intervention (inspection un jour, travaux plus tard), ce qui représente une perte de temps par rapport à une intervention unique.
Étape 6 : Fermeture et rangement du couvercle de protection
Fermez et verrouillez tous les couvercles de protection avant le remisage. Le maintien des protections fermées pendant le remisage empêche : la nidification des oiseaux et des rongeurs dans le mécanisme de nouage (un problème courant et destructeur pour les presses à balles remisées dans les granges) ; l’exposition aux intempéries des surfaces de précision du noueur ; et l’accumulation de poussière et de débris qui se déposent sur les surfaces ouvertes du mécanisme après plusieurs mois de remisage.
Si la presse à balles est entreposée sur un terrain plat, le pick-up doit être relevé en position de transport afin d'éviter que les roues de jauge ne restent sous charge pendant des mois. La goulotte d'éjection des balles doit être abaissée, sans tension sur le système hydraulique ni sur le ressort. Si le tracteur est utilisé pour d'autres tâches hors saison, retirez l'arbre de prise de force et entreposez-le séparément ; un arbre de prise de force laissé connecté à une machine inutilisée dans un environnement humide peut se corroder au niveau de la cannelure, ce qui rend le désengagement du ressort difficile.
Stockage intérieur vs stockage extérieur : la différence en termes de durée de vie de la machine
Entreposage intérieur (grange ou hangar à matériel)
Durée de vie du cadre : La peinture des bords de soudure et des joints du châssis est protégée des cycles d'humidité et de sécheresse qui provoquent la corrosion des bords et, à terme, un affaiblissement du châssis. Les machines entreposées à l'intérieur présentent systématiquement une corrosion du châssis nettement inférieure après plus de 10 saisons que celles entreposées à l'extérieur.
Caoutchouc et plastique : Les rayons UV du soleil dégradent les joints en caoutchouc, les protections en plastique et l'isolation des câbles. Le stockage à l'intérieur élimine complètement ce risque de dégradation.
Exigences de nettoyage : Nettoyez la machine avant de la ranger à l'intérieur — une machine sale rangée dans une grange concentre l'humidité des résidus de récolte sur les surfaces métalliques, qui, dans un environnement de grange sans séchage par le vent, mettent plus de temps à s'évaporer qu'à l'extérieur.
Stockage extérieur (avec bâche adaptée)
Exigences relatives aux bâches : Utilisez une bâche intégrale adaptée aux dimensions de la machine. La bâche doit recouvrir la machine jusqu'au sol sur tous les côtés afin d'empêcher la pluie poussée par le vent de s'infiltrer par le bas. Fixez-la solidement contre le vent : une bâche qui se soulève est pire que rien, car elle emprisonne l'humidité en dessous.
Respirabilité : Une bâche totalement étanche et non respirante emprisonne la condensation, accélérant ainsi les dégâts causés par l'humidité. Utilisez une bâche imperméable et respirante plutôt qu'une feuille de plastique imperméable.
Position de stockage : Stationnez la machine sur un sol stable, et non dans une zone basse où l'eau stagne. Le châssis ne doit en aucun cas être en contact avec l'eau pendant la période de stockage.
Liste de contrôle pour la remise en service printanière
Veuillez effectuer les opérations suivantes avant la première séance de chaque nouvelle saison. Ceci s'ajoute à la révision annuelle complète de pré-saison (voir le guide d'entretien G1) :
PRINTEMPS 1
Retirez et inspectez la bâche Vérifiez l'état de la machine avant la fin du stockage. Repérez les zones où l'humidité a pénétré malgré la bâche et inspectez-les pour détecter toute corrosion. Rangez la bâche dans un endroit sec afin qu'elle puisse être réutilisée la saison prochaine.
PRINTEMPS 2
Vérifiez la présence de nids de rongeurs ou d'oiseaux. Dans le mécanisme de nouage, l'entrée d'alimentation et la chambre de pressage, même en entrepôt couvert, retirez tout matériau d'empilement avant de graisser, car celui-ci peut obstruer les raccords et retenir l'humidité au niveau des surfaces du mécanisme.
PRINTEMPS 3
Graissez à nouveau tous les raccords — le graissage de printemps complète le graissage de fin de saison avant remisage et garantit une lubrification optimale pour la première utilisation.
PRINTEMPS 4
Retendez la chaîne de transmission Vérifiez le bon fonctionnement de la chaîne et appliquez de l'huile neuve. La tension de la chaîne peut avoir diminué suite à un léger relâchement lors du stockage ou à la dilatation thermique du ressort.
PRINTEMPS 5
Installez de la ficelle neuve Utilisez du stock provenant de vos achats de la saison en cours ou de votre réserve scellée. Enfilez le fil correctement en suivant le schéma du manuel d'utilisation. N'utilisez pas de stock resté sur la machine pendant l'hiver ou entreposé à l'extérieur.
PRINTEMPS 6
Effectuez l'intégralité du service annuel de pré-saison (inspection de tous les composants par rapport aux spécifications, remplacement des pièces d'usure annuelles, test de vérification de 20 balles) avant de déclarer la machine prête pour la saison.
Préparation du stockage de la prise de force et du variateur
Foire aux questions — Hivernage des presses à balles carrées
Je n'ai pas préparé le remisage de fin de saison l'an dernier. Que dois-je faire en premier au printemps ?+
Prévoyez plus de temps pour l'entretien de pré-saison cette année. Commencez par une inspection minutieuse afin de détecter toute trace de rouille due à un manque de préparation lors de l'hivernage : vérifiez toutes les surfaces métalliques nues (face du piston, arêtes de coupe, pointes d'aiguille) pour repérer la rouille superficielle. Une légère rouille superficielle peut être éliminée avec un chiffon abrasif fin ; la rouille par piqûres indique qu'il faut remplacer la machine. Vérifiez chaque roulement en le faisant tourner à la main : une résistance granuleuse peut indiquer une corrosion par piqûres due à l'humidité pendant l'hiver. Vérifiez la chaîne de transmission : un maillon rigide signifie qu'il est grippé et provoquera une surtension à chaque passage sur les pignons. Inspectez les surfaces du mécanisme de nouage pour détecter tout dépôt de rouille. Une fois l'évaluation des dommages terminée, procédez à l'entretien de pré-saison standard et remplacez les composants endommagés par un manque de préparation lors de l'hivernage. À l'avenir, en effectuant la procédure d'hivernage en fin de saison, vous éviterez d'avoir à effectuer ces réparations.
Combien de temps une presse à balles de la série 9YF peut-elle être stockée sans entretien ?+
Avec une préparation adéquate pour l'hivernage en fin de saison (nettoyage, graissage complet, protection antirouille, stockage sous bâche), une presse à balles de la série 9YF peut être stockée pendant 4 à 7 mois sans dégradation significative. La graisse de stockage reste efficace durant cette période : un joint d'étanchéité sur un palier empêche l'humidité de pénétrer et la protection anticorrosion assurée par les surfaces métalliques nues huilées est efficace pendant 3 à 6 mois selon l'humidité ambiante. Sans préparation adéquate, une corrosion importante peut se développer en 6 à 8 semaines d'humidité sur une machine non protégée. Une machine correctement stockée pendant un an devrait se présenter à la révision annuelle de pré-saison dans un état comparable à celui d'une machine ayant fonctionné la saison précédente et ayant bénéficié d'une préparation de fin de saison appropriée. Au-delà d'un an de stockage, une inspection plus approfondie est nécessaire, incluant la vérification de la fraîcheur du lubrifiant et un examen plus détaillé des composants avant la première utilisation.
Dois-je tendre ou détendre complètement les ressorts de densité pour le stockage ?+
Pour le remisage, réduisez la tension du ressort de compression au minimum (et non à zéro). Cela réduit la charge statique sur le ressort pendant le remisage et ralentit ainsi son usure. Un ressort maintenu à compression maximale pendant des mois s'use davantage qu'un ressort maintenu à compression minimale pendant la même période. Ne retirez pas complètement le ressort du mécanisme, sauf indication contraire dans le manuel d'utilisation. Lors de la remise en service pour la saison suivante, rétablissez la tension du ressort de compression au réglage utilisé en fin de saison précédente, conformément à la procédure d'entretien de pré-saison. Vérifiez ensuite le poids des balles lors du test de 20 balles et ajustez si nécessaire.
Que se passe-t-il si des oiseaux ou des rongeurs nichent dans ma presse à balles pendant l'hivernage ?+
La nidification de rongeurs et d'oiseaux dans les presses à balles est un problème courant lors du stockage, notamment au niveau de la protection du mécanisme de nouage et dans la chambre de pressage où la chaleur résiduelle et l'espace confiné attirent les animaux nicheurs en fin d'automne. Les dégâts causés par la nidification sont les suivants : isolation rongée sur les câbles (panneaux de contrôle), ficelle utilisée pour la construction du nid (le cas échéant) et obstruction des graisseurs et des jeux mécaniques par les matériaux du nid eux-mêmes. Prévention : fermez soigneusement tous les capots de protection et bouchez les grands interstices (comme l'orifice d'entrée) avec un chiffon légèrement compressé ou un bouchon en mousse, amovible au printemps. Ceci bloque le point d'entrée sans sceller définitivement la machine. En cas de nidification : retirez soigneusement tous les matériaux du nid avant la révision de pré-saison, puis soufflez à l'air comprimé pour éliminer tout résidu dans les jeux mécaniques, inspectez tous les composants et nettoyez tous les raccords avant le graissage.
Puis-je me dispenser de l'entreposage de fin de saison si la machine se trouve dans un climat sec ?+
Dans les climats constamment secs — les régions arides de Californie, du Nevada et de l'Arizona où l'humidité hivernale reste faible et les températures descendent rarement en dessous de 5 °C — le risque de corrosion lié à l'omission de la procédure d'hivernage est nettement inférieur à celui observé dans le Sud-Est humide ou le Nord-Ouest Pacifique humide. Cependant, les autres tâches d'hivernage demeurent importantes quel que soit le climat : retrait de la ficelle (risque de dégradation par les UV dû à toute exposition au soleil), nettoyage (les résidus de récolte retiennent les acides organiques sur les surfaces métalliques, même par temps sec) et fermeture de toutes les protections (la nidification des rongeurs est également possible en climat sec). La procédure d'hivernage minimale en climat sec consiste à : retirer la ficelle, nettoyer la machine, appliquer un inhibiteur de rouille sur les surfaces métalliques nues et fermer toutes les protections. Le graissage complet avant hivernage peut être reporté à la révision de pré-saison dans les climats à faible humidité si la machine est entreposée à l'abri. En climat humide, le graissage complet avant hivernage est indispensable.
Ma presse à balles est utilisée toute l'année ; pas besoin de remise à l'hiver. Existe-t-il un équivalent en matière de préparation à l'hiver ?+
Les exploitations qui pressent les balles toute l'année sans interruption saisonnière — courantes en Floride, à Hawaï et dans certaines régions de Californie où la saison de croissance est continue — bénéficient d'un programme d'entretien périodique complet, incluant un nettoyage et une inspection approfondis, même sans période de stockage définie. Cet entretien annuel équivaut à un nettoyage complet et à une inspection des composants tous les 6 mois ou toutes les 30 000 balles, selon la première échéance. Il remplit la même fonction que la procédure de stockage de fin de saison : éliminer les résidus de récolte accumulés sur les surfaces des mécanismes, renouveler la lubrification de tous les raccords, vérifier la conformité de tous les composants aux spécifications et commander les pièces défectueuses avant toute panne. Cet entretien annuel ne nécessite pas d'interruption hivernale ; il requiert simplement un arrêt programmé de la production pour l'inspection et la maintenance, que les exploitations fonctionnant toute l'année devraient planifier pendant la période de plus faible activité de leur cycle de production.
Quel produit antirouille dois-je utiliser sur la face du piston et les lames du couteau ?+
Plusieurs produits conviennent : l’huile de machine légère (ISO VG 32 ou VG 46) appliquée au chiffon est l’option la plus simple et la plus courante. Elle forme un film protecteur qui empêche l’humidité d’entrer en contact avec la surface métallique et s’essuie facilement au printemps avant la première utilisation de la lame. Les sprays antirouille spécifiques (Fluid Film, Boeshield T-9, Corrosion Block) sont plus persistants que l’huile et offrent une meilleure protection dans les environnements de stockage très humides. Le WD-40 est parfois utilisé, mais n’est pas idéal : ses propriétés hydrofuges sont utiles lors de la première application, mais il s’évapore en 2 à 4 semaines et n’offre pas la persistance du film nécessaire pour un hivernage complet. Pour les applications de stockage où la protection doit durer de 3 à 7 mois, les produits antirouille spécifiques sont préférables au WD-40. Quel que soit le produit utilisé sur les lames, il est important de les essuyer au printemps avant la première utilisation. Un résidu d’antirouille sur la lame modifie légèrement le frottement et peut entraîner une accumulation de résidus de récolte sur le tranchant pendant la coupe.
Comment dois-je stocker une presse à balles que je prévois de vendre au printemps prochain ?+
Préparez la machine pour l'entreposage exactement comme décrit dans ce guide : son état à la vente de printemps influe directement sur sa valeur de revente. Une presse à balles nettoyée, graissée, protégée contre la rouille et correctement bâchée se vend beaucoup mieux qu'une machine laissée sale, avec des résidus de récolte accumulés, de la rouille superficielle et un film d'huile ancien sur le métal nu. Le coût de la préparation pour l'entreposage, qui représente une à deux heures de travail et quelques consommables, augmente généralement le prix de vente bien plus que le temps investi. De plus : photographiez la procédure d'entreposage terminée (machine nettoyée, protections fermées, graisseurs) et joignez ces photos à l'annonce de vente. Une préparation pour l'entreposage documentée témoigne d'un entretien rigoureux, ce qui rassure l'acheteur et justifie le prix demandé. Les factures d'entretien des saisons précédentes doivent également être mises à la disposition des acheteurs avec les documents de vente.
Pièces pour l'entretien de pré-saison de printemps — Commandez dès maintenant pour une livraison à temps
Identifiez les pièces dont vous aurez besoin pour l'entretien de pré-saison pendant l'hiver et commandez-les dès maintenant pour une livraison au printemps. Contactez-nous pour nous faire part de vos besoins. Modèle 9YF et le numéro de série, et nous pourrons ainsi confirmer les pièces correctes pour votre machine.
Éditeur : Cxm